 Skip to content
For concrete subfloors, run ASTM F2170 in-situ relative humidity probes at 40% slab depth. That’s the industry-preferred method for real installation decisions. For wood subfloors, use a calibrated pin or pinless moisture meter across multiple sampling points and compare readings to the framing. Either way, don’t touch a probe until the HVAC has run at service conditions for 48 hours, and always double-check your flooring product’s technical data sheet before calling a reading a pass or fail.
TL;DR:
- ASTM F2170 measures internal concrete slab humidity at 40% depth, providing the most predictive data for long-term moisture behavior.
- Testing should only be done after minimum 28 days of slab curing and after HVAC has run at normal conditions for at least 48 hours.
- In-situ RH and calcium chloride tests are most reliable when combined with surface moisture screening to identify problem zones.
- Wood subfloor moisture content should be within 2 to 4 percentage points of the hardwood, with site acclimation crucial to prevent cupping or buckling.
- Professional ASTM-compliant testing is recommended for warranty validation, water intrusion issues, or when inconsistencies suggest localized leaks or moisture sources.
Table of Contents
- Why Subfloor Moisture Testing Matters More Than You Think
- Main Subfloor Moisture Testing Methods Compared
- How to Test Wood Subfloors the Right Way
- How to Test Concrete Subfloors: ASTM F2170 and F1869 Step by Step
- Job-Site Checklist for a Compliant Moisture Assessment
- What Do Subfloor Moisture Readings Actually Mean?
- Common Subfloor Moisture Testing Mistakes
- When to Call In a Professional for Certified Testing
- A Field-Tested Take on Moisture Testing Timing
- How J.R. Hardwood Handles Testing and Installation Signoff
- Standards and Guides Behind This Article
- Sources
- FAQ
Why Subfloor Moisture Testing Matters More Than You Think
We’ve walked into more than a few homes where gorgeous new floors were already lifting at the seams six months after installation. Nine times out of ten, the culprit traces back to one thing: nobody checked the moisture content measurement before the flooring went down.
Wood floors that go down over a subfloor with excess moisture don’t fail gracefully. They cup, crown, or buckle as the wood absorbs water it was never meant to hold. Resilient flooring and adhesives can delaminate outright, leaving bubbled sheets that no amount of patching fixes. And once trapped moisture sits under a sealed floor system, mold isn’t far behind, especially in humid basements or below-grade slabs across Colorado’s varied microclimates.
Here’s the part that catches people off guard: flooring manufacturers build their warranties around ASTM-compliant moisture reports. If you skip the standardized testing and something goes wrong later, most manufacturers will deny the claim outright. Your installer’s craftsmanship won’t matter if the paperwork behind the job doesn’t check out.
Timing plays just as big a role as the test itself. Concrete needs to cure for a minimum period before moisture readings mean anything. Test too early on a fresh pour and you’ll get numbers that look alarming but simply reflect normal early curing, not a real problem. Most guidance points to waiting at least 28 days after concrete placement before relying on any moisture test for installation decisions, longer if the slab sits over damp subgrade or was treated with a curing compound.
The other non-negotiable: the building’s HVAC system has to run at normal service conditions for a sufficient conditioning period before you test. Testing in a building with the heat off in January or no air conditioning running in July gives you numbers that don’t reflect how the space will actually behave once it’s occupied.
What this looks like in practice:
- Concrete under 28 days old should not be treated as final-condition data, even if it “passes.”
- HVAC must be at service temperature and humidity for 48 hours minimum before probe insertion.
- Any test performed after a known water event (leak, flood, heavy rain intrusion) needs extra drying time before retesting.
- Warranty claims almost always require a report tied to a named ASTM method, not a quick meter scan.
Main Subfloor Moisture Testing Methods Compared
Three tools dominate this field, and each one answers a slightly different question. Confusing them is where a lot of testing mistakes start.
ASTM F2170 (in-situ relative humidity probes) measures the relative humidity inside the concrete slab itself, at 40% of its total depth. This is the method most aligned with how a slab will actually behave under a sealed floor system, because it captures the internal equilibrium moisture condition rather than just what’s happening at the surface on test day.
ASTM F1869 (calcium chloride, or MVER testing) measures moisture vapor emission rate at the surface of the slab, expressed in pounds per 1,000 square feet per 24 hours. A sealed dish of calcium chloride sits on the concrete for a set period, absorbing ambient vapor, and the weight gain gets converted into an emission rate.
Surface moisture meters (pin and pinless, for both wood and concrete) give you a fast, non-destructive read on relative moisture content at or near the surface. They’re genuinely useful, but they read only the upper layer of material, roughly the top three-quarters of an inch on concrete, and generally don’t satisfy ASTM compliance requirements for warranty documentation.
Here’s how the tradeoffs break down:
| Method | What it measures | Best for | Limitation |
|---|---|---|---|
| F2170 RH probes | Internal RH at 40% slab depth | Predicting long-term slab behavior under finished floors | Requires drilling, sleeves, and equilibration time |
| F1869 calcium chloride | Surface moisture vapor emission rate | Legacy compliance, some manufacturer specs | Sensitive to ambient humidity swings during test |
| Surface meters (pin/pinless) | Relative moisture near the surface | Fast screening, spotting problem zones | Reads shallow depth only; not warranty-grade alone |
Because F1869 only captures what’s happening at the surface, it’s more sensitive to short-term ambient swings during the test window. F2170 probes, sitting deeper in the slab, tend to be more predictive of the equilibrium condition the concrete will settle into once flooring and adhesive seal it off. That’s a big part of why RH testing has become the default choice on most commercial and residential jobs today.
The smartest workflow combines all three tools instead of picking just one:
- Walk the whole floor with a surface meter first. This is fast, cheap, and tells you where the trouble spots probably are.
- Flag any zones reading unusually high or showing wide variation from one spot to the next.
- Run ASTM-compliant testing, F2170 or F1869, at those flagged locations plus your standard sampling grid.
- Document everything before making a go/no-go call on installation.
This layered approach, screening broadly then confirming with a recognized standard, keeps costs reasonable while still producing warranty-grade data exactly where it matters. Skipping straight to a meter reading and calling it done is the single most common shortcut that comes back to bite people later.
How to Test Wood Subfloors the Right Way
Wood subfloors play by different rules than concrete, mostly because wood is hygroscopic. It’s constantly trading moisture with the air around it, which means the number you get depends heavily on when and where you check.
Pin meters push two small electrodes into the wood and measure electrical resistance between them, which correlates to moisture content. They’re accurate and let you check at different depths, but they leave tiny holes, which matters if the subfloor will be visible or if you’re testing a finished wood surface rather than raw subflooring.
Pinless meters use electromagnetic sensors to scan moisture content without puncturing anything. They’re faster for covering large areas and leave no marks, though they can be thrown off by embedded metal fasteners or by moisture concentrated right at the surface rather than distributed through the board.
Here’s a practical approach for sampling density and interpretation:
- Take readings across the whole space rather than just near doors or walls, since moisture often varies by location depending on plumbing lines, exterior exposure, and grade elevation below the joists.
- Follow the common industry practice of roughly 20 reading locations per 1,000 square feet, spacing them in a rough grid pattern rather than clustering them in one corner.
- Take a comparison reading from the actual hardwood flooring material itself, not just the subfloor, so you can measure the gap between the two.
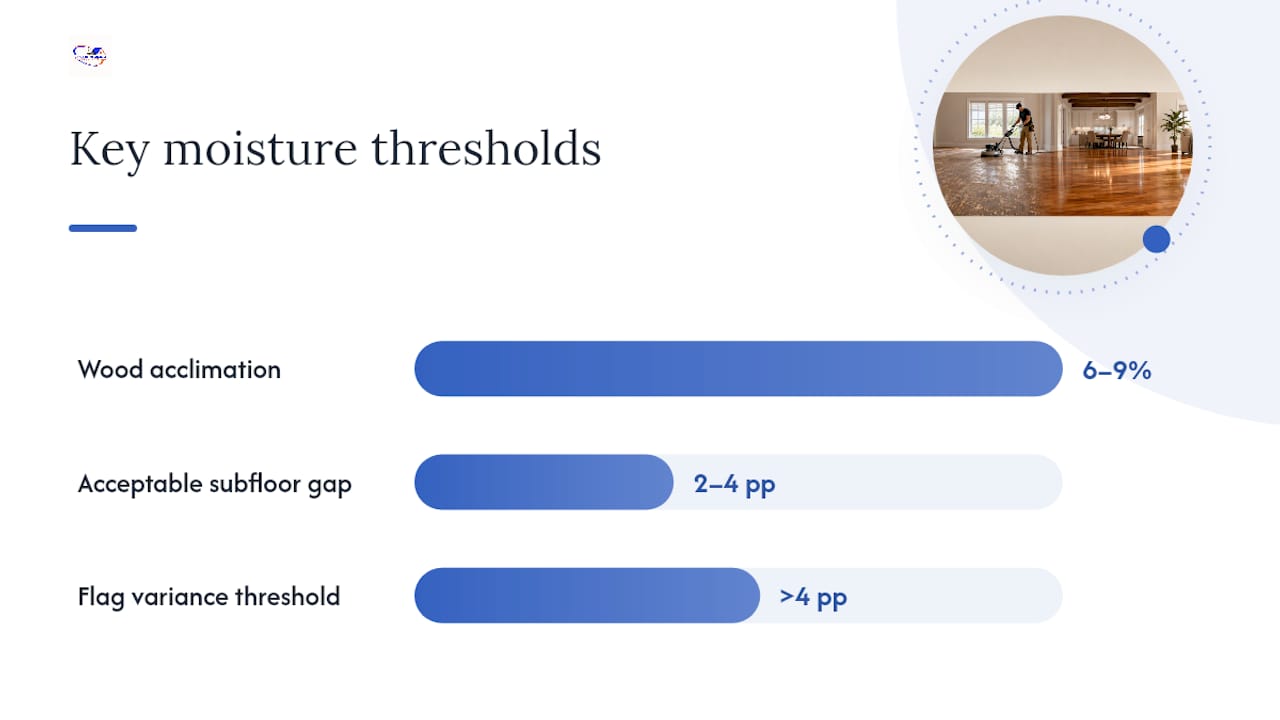
- Flag any single reading that differs from the group average by more than 4 percentage points. That spread usually points to a localized leak or moisture source rather than general ambient humidity.
- Record every reading with its location marked on a simple floor sketch so you can spot patterns instead of relying on memory.
As a general target, most solid hardwood installations want the subfloor and the flooring material within 2 to 4 percentage points of each other, with the wood itself typically acclimated somewhere in the 6% to 9% range depending on your regional climate and the specific product. Colorado’s dry climate along the Front Range often runs lower than humid coastal regions, which is exactly why flooring acclimation matters so much here. Give new hardwood time in the space, on-site, before installation, rather than nailing it down the same day it arrives. Rushing acclimation is one of the most common reasons a floor that tested “fine” still cups within its first winter.
How to Test Concrete Subfloors: ASTM F2170 and F1869 Step by Step
Concrete testing rewards patience. Rush any part of the sequence below and you’ll get a number that looks official but tells you nothing reliable.
Before drilling anything, confirm three things: the slab is old enough to test (28 days minimum, longer if curing compounds or subgrade moisture are involved), the space has been climate controlled at service conditions for 48 hours straight, and the surface is clean and dry with no active water intrusion. If there’s been a recent leak or flood anywhere near the test area, wait for that moisture to fully dissipate before testing. Testing over an active water source just gives you a snapshot of the leak, not the slab’s actual condition.
F2170 procedure, step by step:
- Select test locations based on square footage. Industry guidance generally calls for a minimum of three tests for the first 1,000 square feet, plus one additional test for every 1,000 square feet after that.
- Drill each hole to 40% of the total slab depth, within about 5% tolerance, since this depth is what makes the reading representative of internal equilibrium rather than surface-level noise.
- Install the sleeve, following manufacturer instructions for insertion and sealing so the hole doesn’t leak ambient air into the reading.
- Seal the hole completely around the sleeve. Any air gap here is one of the most common causes of a false low reading.
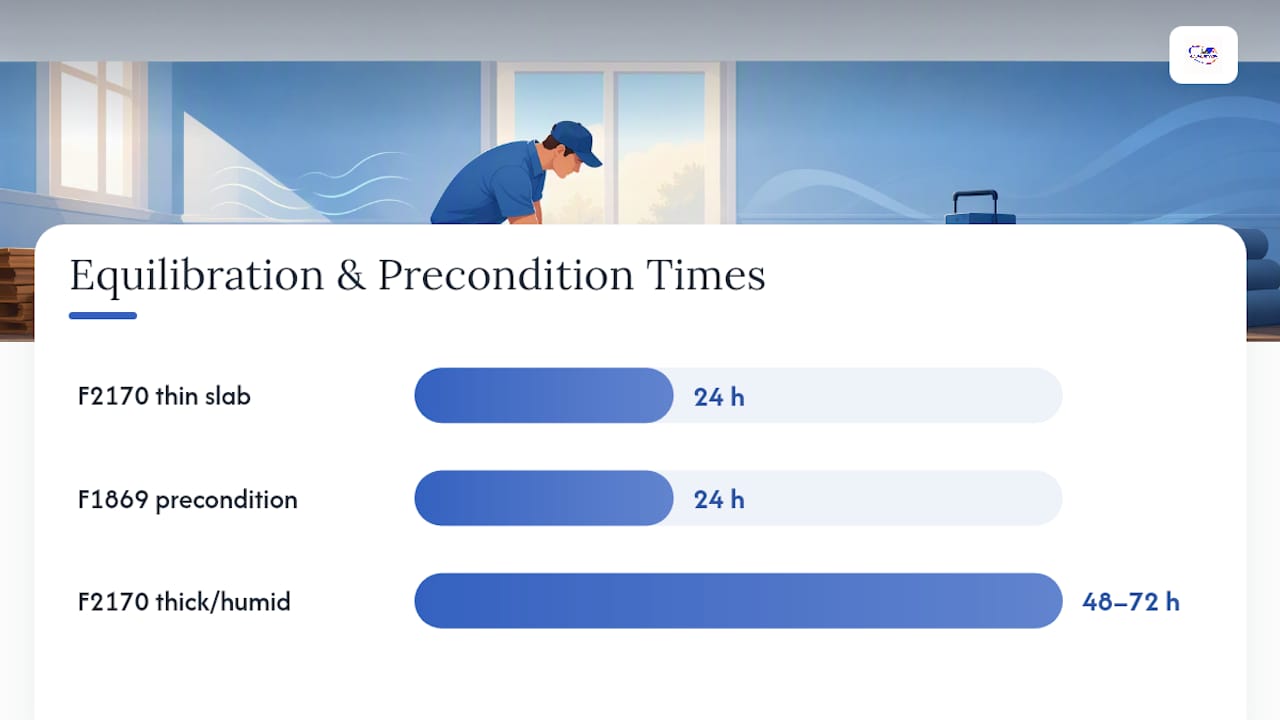
- Let the probe equilibrate. Thinner slabs, around four inches or less, typically need about one day, while thicker slabs or unusually humid job sites may need 48 to 72 hours.
- Check probe calibration before taking your final reading. A saturated salt solution check is a practical daily verification that keeps probes reading within roughly 2% accuracy.
- Record the reading along with the probe ID, location on your floor plan, ambient temperature, and ambient relative humidity at the time of the read.
F1869 procedure, step by step:
- Prepare the surface by grinding away any laitance, coatings, or contaminants so the calcium chloride dish sits on bare, representative concrete.
- Precondition the test area by covering it with a plastic sheet for at least 24 hours before placing the dish, which helps confirm the surface is dry enough to start a valid test.
- Place the sealed calcium chloride dish under its dome and seal the dome edges completely to the floor.
- Let the test run for several days without disturbing the setup.
- Weigh the dish immediately after removing it, to 0.1 gram precision, since delays introduce moisture exchange errors that skew your result.
- Calculate the moisture vapor emission rate using the weight gain, test duration, and dish surface area.
Pro Tip: Keep a spare roll of sealing tape and extra sleeves on the truck. A surprising number of “failed” moisture tests turn out to be air leaks around a poorly sealed probe hole, not an actual slab problem.
Dust contamination during drilling is another silent test killer. Vacuum the hole thoroughly before sleeve installation. Debris left in the hole can trap or block moisture transfer and skew the reading in either direction.
Job-Site Checklist for a Compliant Moisture Assessment
A test result only carries weight if the process behind it can hold up under a warranty review. Here’s the sequence we’d follow on any job where the flooring manufacturer or property owner needs documentation, not just a gut check.
- Confirm the slab or subfloor meets minimum age and drying requirements before scheduling the test.
- Verify HVAC has run at service conditions for at least 48 hours prior to test day.
- Map out test locations using the density rule: three probes for the first 1,000 square feet, plus one per additional 1,000 square feet, adjusted upward for large open spans or slabs poured in multiple sections.
- Drill, sleeve, and seal each probe location following F2170 procedure, or prep and place calcium chloride dishes per F1869.
- Let probes equilibrate for the appropriate window based on slab thickness, typically 24 hours for slabs up to 4 inches and 48 to 72 hours for thicker or more humid conditions.
- Verify probe calibration immediately before recording final readings.
- Photograph each test location, the probe or dish in place, and the general job site conditions.
- Compile the report.
A report that actually holds up should include:
- The test method used (F2170, F1869, or both) and probe calibration confirmation.
- Ambient temperature and relative humidity readings at time of test.
- A floor plan diagram showing exact test locations with probe ID numbers.
- Slab age, curing method, and any known history of water exposure.
- Technician name and signature, plus the date and time each reading was taken.
If results come back failing, the next move depends on severity. Mild overages sometimes resolve with extended drying time and continued HVAC operation, then a retest. Higher readings usually call for a moisture mitigation system, an epoxy or silicate-based vapor barrier applied to the slab, before flooring goes down. Either way, retest after any remediation using the same method and locations so you’re comparing apples to apples.
What Do Subfloor Moisture Readings Actually Mean?
Numbers without context are just noise. What counts as a passing test depends entirely on what’s going on top of the subfloor.
Many resilient flooring products call for RH readings of 75% to 85% or below under F2170, or MVER readings of 3 to 5 pounds per 1,000 square feet per 24 hours under F1869. Those are common ranges, not universal law. The only figure that actually governs your installation is whatever your specific flooring manufacturer states on that product’s technical data sheet. Some engineered wood adhesives are far more forgiving; some moisture-sensitive luxury vinyl products are stricter. Skipping the TDS check and relying on a generic rule of thumb is how installations that “passed a moisture test” still fail.
Quick reference by flooring type:
- Solid hardwood: Wants subfloor and flooring moisture content within 2 to 4 percentage points of each other, plus proper acclimation time.
- Engineered hardwood over concrete: Typically needs F2170 confirmation before installation, since many warranties specifically require it.
- Luxury vinyl (LVT): Often among the stricter thresholds for RH and MVER; always check the adhesive manufacturer’s requirements separately from the plank manufacturer’s.
- Carpet: Generally more forgiving on moisture than hard-surface flooring, but pad and adhesive specs still matter.
- Epoxy coatings: Frequently among the tightest tolerances of any flooring category, since trapped vapor under epoxy has nowhere to escape.
If your readings jump wildly from one test location to the next, treat that variation itself as the finding. It usually points to multiple concrete pours, a localized sub-slab leak, or an isolated moisture source rather than a uniform slab-wide condition, which means the fix is targeted, not a blanket mitigation across the whole floor.
Common Subfloor Moisture Testing Mistakes
Most bad test results trace back to a handful of repeat offenders, and nearly all of them are avoidable.
- HVAC not conditioned long enough. Testing before the 48 hour service-condition window gives readings that don’t reflect real occupied conditions.
- Dirty or contaminated test surface. Coatings, laitance, or dust under a probe sleeve or calcium chloride dish can throw off results in either direction.
- Poorly sealed sleeves or dome edges. Air leaks are probably the single most common cause of a falsely low RH reading.
- Uncalibrated probes. Skipping the daily saturated salt solution check means you’re trusting equipment that might be drifting.
- Testing too soon after a water event. A recent leak, spill, or flood needs full drying time before a reading means anything.
When a result looks suspicious, whether it’s suspiciously low or unexpectedly high, don’t just accept it and move on. Repeat the test at the same spot with a freshly calibrated probe. Try an adjacent location to see if the number holds. If it doesn’t, that inconsistency itself is diagnostic information pointing toward a leak, a drainage issue, or a sealing problem with your setup, not a fluke you should ignore.
Pro Tip: If a slab was recently power-washed, mopped, or exposed to rain through an open bay door, give it several extra days before testing. That surface water skews readings even after it looks dry.
When to Call In a Professional for Certified Testing
Some situations call for a professional, ASTM-documented test rather than a DIY read with a hardware store meter. Warranty claims, commercial projects, evidence of a past leak, or wildly inconsistent readings across a floor plate all fall into that category. If a manufacturer, insurer, or property manager will ever need to see paperwork, get the paperwork right the first time.
A compliant report should include the specific ASTM method used, calibration verification, ambient temperature and humidity at test time, a floor plan diagram marking every test location, and a signed technician confirmation.
If you’re weighing whether to book a professional test or handle screening yourself, keep this in mind:
- Meters are fine for a quick gut check on a small residential project with no warranty on the line.
- ASTM-documented testing is worth the cost anytime a manufacturer warranty, commercial contract, or resale disclosure is involved.
- A single wildly high or wildly inconsistent reading is reason enough to bring in a professional before proceeding.
A Field-Tested Take on Moisture Testing Timing
If there’s one thing worth stressing beyond the standards themselves, it’s this: run your screening meter across the whole floor before you schedule anything formal. Most jobs don’t need ASTM testing everywhere, they need it exactly where the meter flags a problem. Spending money on probes in a dozen spots that were never going to fail is wasted budget you could put toward the one spot that actually needs attention.
Schedule testing early in the project timeline, ideally right after demolition or before flooring materials even arrive on site. Waiting until installation day to discover a moisture problem turns a manageable delay into a scheduling nightmare, with crews standing around and materials sitting in a garage acclimating to the wrong conditions.
Testing costs real money, but it’s nothing compared to tearing out a buckled floor eighteen months later.
— J.R.
How J.R. Hardwood Handles Testing and Installation Signoff
Coordinating moisture testing yourself means juggling equipment, standards, and timing on top of everything else a flooring project demands. Customers have the option to use a local team to handle inspection, coordination for ASTM-compliant testing, and installation-ready verification, so the moisture question can be resolved before crews arrive with materials.

We start every project with a free over-the-phone quote based on a few photos and some basic details about your space. Have your slab age (if it’s concrete), the flooring type you’re planning to install, and any history of leaks or water damage ready when you call. That’s enough for us to talk through next steps, including whether your subfloor needs formal testing before installation.
The company offers standards-based moisture assessment alongside refinishing and installation work in the Colorado area. If you’re planning new flooring and want the subfloor question settled properly, start with our guide to professional hardwood floor installation and reach out for your free quote today.
Standards and Guides Behind This Article
- ASTM F2170 vs F1869: Which moisture test fits your project? — comparison of the two core ASTM methods.
- 10 guidelines for ASTM F2170 compliance — HVAC and testing precondition standards.
- How to test concrete floor moisture: field guide — step-by-step procedures and documentation requirements.
- RH testing on concrete slabs — threshold guidance across flooring categories.
- Choose the right test — comparing screening meters against ASTM methods.
Sources
- RH testing on concrete slabs — Install Floors/industry guidance
- How to test concrete floor moisture: field guide — IFTI
FAQ
What Is an Acceptable Moisture Reading for a Subfloor?
It depends entirely on the flooring product going down, but many resilient flooring lines require RH readings of 75% to 85% or below under F2170, or MVER readings of 3 to 5 pounds per 1,000 square feet per 24 hours under F1869. Always confirm the exact threshold on your specific product’s technical data sheet.
Will a Subfloor Dry Out on Its Own?
Sometimes, if the moisture source is temporary and the HVAC system runs consistently, but subfloors sitting over persistent groundwater or a slow leak or inadequate ventilation often won’t dry to an acceptable level without active mitigation. Retesting after a drying period is the only reliable way to know.
Is 10% Moisture Content in Wood Bad?
For most solid hardwood installations, 10% is considered relatively high moisture content, since acclimated wood typically sits within a lower moisture range depending on regional climate. What matters most is the gap between the subfloor and the flooring material rather than the number alone.
How Do You Get Moisture Out of a Subfloor?
Running the HVAC consistently at service conditions is the first step, sometimes combined with dehumidifiers or extended drying time before retesting. For concrete with persistent high readings, a moisture mitigation coating or vapor barrier applied before installation is often the more reliable long-term fix, and a team like Jrhardwoodfloorrefinishingandcleaning can help coordinate that mitigation alongside installation-ready testing.